

I don’t know about you, but my social media feeds have been absolutely exploding with the most gorgeous food boards lately. There is something so satisfying about a beautifully arranged spread that invites everyone to dig in and enjoy together. It’s not just about the food; it’s about the feeling of abundance and the effortless way a well-curated board turns a simple evening into a memorable event. Whether you’re celebrating a massive milestone or just trying to survive a Tuesday, these boards are the answer to your ‘what’s for dinner’ woes.
Today, I’m sharing my absolute favorites that take the ‘viral’ trend and make it actually doable in your own kitchen. We’re talking about textures that crunch, flavors that pop, and presentations that will have your friends asking for your secrets. The best part? Most of these rely on fresh, seasonal ingredients like tart rhubarb and sweet strawberries, perfect for transitioning into those warm summer nights. Let’s dive into these 10-minute (or slightly more!) masterpieces that will elevate your hosting game instantly.
Professional Graduation Cake Decoration Guide

Why we love this
There is nothing quite like the pride of presenting a homemade cake that looks like it walked straight out of a high-end patisserie window. Imagine the soft, velvet texture of Swiss meringue buttercream yielding to a moist sponge, while the delicate scent of vanilla bean wafts through the air. This board approach focuses on the elements of decoration—fresh flowers, gold leaf, and piped borders—allowing guests to see the artistry before the first slice is served. It transforms a standard dessert into a centerpiece that captures the essence of achievement and celebration.
Ingredients
- 1 Pre-baked 8-inch double-layer vanilla or chocolate cake
- 3 cups Swiss Meringue Buttercream
- Edible gold leaf flakes
- Fresh, organic edible flowers (pansies or lavender)
- Assorted piping tips (Star and Round)
- Cake scraper and offset spatula
How to make it
- Begin by chilling your pre-baked cake layers until they are firm to the touch; this prevents crumbs from tearing into your frosting. Place the first layer on a rotating cake stand and apply a generous half-inch of buttercream, spreading it evenly with your offset spatula until it reaches the edges.
- Stack the second layer top-side down to ensure a perfectly flat surface. Apply a thin ‘crumb coat’ of frosting over the entire cake, smoothing it with the cake scraper held at a 45-degree angle. Chill the cake for 20 minutes until the frosting is set and no longer tacky.
- Apply the final thick layer of buttercream. Use the cake scraper in one continuous motion as you spin the stand to create a professional, sharp-edged finish. If you see gaps, fill them with more frosting and scrape again.
- Load your piping bag with a star tip and create a ‘shell’ border around the base by squeezing, pulling, and releasing in a rhythmic pattern. For the top, use tweezers to carefully place gold leaf flakes in a cluster, then accent with fresh flowers for a botanical, sophisticated look.
Mastering the Perfect Rhubarb Pie

Why we love this
Rhubarb pie is the ultimate herald of summer, offering a sophisticated balance of bracing tartness and deep, caramelized sweetness. When you slice into a perfectly baked pie, the filling should be thick and glossy, not runny, smelling of toasted butter and bright citrus zest. The flaky crust shatters upon impact, providing a buttery, salty contrast to the vibrant pink stalks that have softened into a jam-like consistency. It’s a nostalgic experience that feels both rustic and refined, perfect for a cozy gathering on the porch.
Ingredients
- 2 batches of chilled pie dough (homemade or high-quality store-bought)
- 5 cups fresh rhubarb, cut into 1/2-inch pieces
- 1 1/4 cups granulated sugar
- 1/4 cup cornstarch
- 1 teaspoon orange zest
- 1 tablespoon cold unsalted butter, cubed
- 1 egg (for egg wash)
How to make it
- Preheat your oven to 400°F (200°C) and place a baking sheet on the middle rack to get hot; this ensures the bottom crust bakes through quickly and stays crisp. Roll out your bottom crust and drape it into a 9-inch pie plate, leaving an inch of overhang.
- In a large bowl, toss the cut rhubarb with the sugar, cornstarch, and orange zest. Let this mixture sit for about 10 minutes; you’ll see the sugar start to draw out the juices, creating a natural syrup. Pour the mixture into the prepared crust and dot the top with the small cubes of cold butter.
- Roll out the second piece of dough and cut into 1-inch strips to create a lattice top. Weave the strips over and under each other, then crimp the edges firmly to seal the juices inside. Brush the entire top with a beaten egg wash for that signature golden-brown shine.
- Place the pie on the preheated baking sheet and bake for 20 minutes. Reduce the heat to 375°F and continue baking for another 35-45 minutes. Look for the filling to be bubbling vigorously in the center—this is the visual cue that the cornstarch has reached its thickening power. Cool completely before slicing to let the filling set.
Sophisticated Graduation Cupcake Ideas

Why we love this
Cupcakes are the perfect vessel for creativity, especially when they are displayed as a graduation-themed dessert board. Each small cake is a canvas for rich chocolate ganache or airy whipped frosting, providing a delightful explosion of flavor in every bite. The aroma of freshly baked cocoa and almond extract fills the room, making these little treats irresistible to guests of all ages. By focusing on sophisticated decorations like fondant caps or graduation scrolls, you elevate a simple childhood favorite into a stylish celebratory statement.
Ingredients
- 12 moist dark chocolate cupcakes
- White chocolate ganache (melted white chocolate mixed with heavy cream)
- Small square chocolate bars (for the caps)
- Thin licorice ropes or sour straws
- Miniature chocolate peanut butter cups
- Gold luster dust
How to make it
- Once your cupcakes are completely cool, dip the tops into a bowl of smooth white chocolate ganache. Ensure the ganache is at room temperature so it creates a thick, opaque coating rather than a thin glaze. Let these set for 5 minutes.
- To assemble the ‘graduation caps,’ place a mini peanut butter cup upside down on the center of each cupcake to act as the base. Apply a small dot of melted chocolate to the bottom of a square chocolate bar and press it firmly onto the peanut butter cup.
- Cut a small 1-inch piece of licorice or sour straw to serve as the tassel. Use a drop of honey or melted chocolate to attach it to the center of the square chocolate bar. For a touch of luxury, dip a dry brush into gold luster dust and lightly tap it over the tassels.
- Arrange the finished cupcakes on a large wooden board, spacing them evenly. Fill the gaps between cupcakes with fresh berries or sprigs of mint to create a lush, abundant look that invites guests to help themselves.
The Ultimate Rhubarb Crumble Recipe

Why we love this
If you’re looking for a dessert that feels like a warm hug, this rhubarb crumble is it. The contrast between the tender, ruby-red fruit and the golden, buttery oat topping is simply addictive. As it bakes, the juices from the rhubarb bubble up and mingle with the brown sugar, creating a thick, tangy sauce that contrasts beautifully with the crunch of the topping. Serving this warm with a scoop of melting vanilla bean ice cream creates a sensory experience that is both comforting and incredibly vibrant.
Ingredients
- 6 cups fresh rhubarb, chopped into 1-inch pieces
- 3/4 cup brown sugar (split for filling and topping)
- 1 cup old-fashioned rolled oats
- 1 cup all-purpose flour
- 1/2 cup cold unsalted butter, cubed
- 1 teaspoon ground cinnamon
- A pinch of sea salt
How to make it
- Preheat your oven to 375°F (190°C). In a large baking dish, spread the rhubarb pieces evenly and toss them with 1/4 cup of the brown sugar and a tablespoon of flour. This helps the fruit juices thicken into a syrup rather than staying watery.
- In a separate medium bowl, combine the oats, the remaining brown sugar, flour, cinnamon, and salt. Add the cold, cubed butter. Using your fingers or a pastry cutter, work the butter into the dry ingredients until the mixture resembles coarse crumbs with some pea-sized pieces remaining.
- Sprinkle the crumble mixture generously over the rhubarb. Do not press it down; you want it to stay light and airy so the heat can circulate through the topping, making it extra crispy.
- Bake for 35 to 40 minutes. The topping should be a deep golden brown, and you should see the pink rhubarb juices bubbling around the edges of the dish. Let it rest for at least 15 minutes before serving so the sauce can thicken properly.
Professional Graduation Charcuterie Boards

Why we love this
A professional-grade charcuterie board is the pinnacle of the ‘food board’ trend, offering a savory landscape of textures and flavors. Imagine the saltiness of prosciutto paired with the creamy richness of brie, accented by the sharp tang of aged cheddar and the sweet burst of honey-drizzled figs. This board is designed to satisfy every palate, providing a sophisticated grazing experience that keeps guests engaged and fed throughout a graduation party. It’s visual storytelling at its finest, using food to create a festive, abundant atmosphere.
Ingredients
- Assorted meats: Prosciutto, Salami, Soppressata
- Cheeses: Triple Cream Brie, Aged Manchego, Sharp White Cheddar
- Fruits: Grapes, fresh figs, dried apricots
- Crunch: Marcona almonds, sourdough crackers, breadsticks
- Condiments: Fig jam, honey, grainy mustard
- Garnish: Fresh rosemary and thyme sprigs
How to make it
- Select a large wooden board or slate. Start by placing your ‘anchors’—the small bowls for jams and mustard—in different areas of the board to create balance. Slice the hard cheeses (Manchego) into triangles and crumble the cheddar to create visual variety.
- Create ‘meat ribbons’ by folding slices of prosciutto and salami into thirds and nesting them together in a curved line across the board. This adds height and makes it easy for guests to grab individual portions without disturbing the whole display.
- Fill in the large gaps with clusters of grapes and sliced figs. Ensure colors are distributed evenly; don’t put all the green items in one corner. Place the crackers and breadsticks near the cheeses they pair best with (e.g., sourdough near the brie).
- The final step is the ‘tuck and fill.’ Use the almonds and dried apricots to fill every tiny remaining hole so the board looks overflowing. Finish by tucking sprigs of rosemary and thyme into the edges for a pop of green and a fresh, herbal aroma that enhances the savory scents of the meats.
Aesthetic Summer Coffee Drinks Guide
Why we love this
There is nothing more refreshing on a humid afternoon than a beautifully layered iced coffee that looks as good as it tastes. The sight of dark, rich espresso swirling into creamy oat milk creates a marble effect that is pure art. Each sip offers a sequence of temperatures and textures—from the icy cold liquid to the velvety foam on top, perhaps finished with a hint of vanilla or lavender syrup. It turns a daily caffeine fix into a luxurious ritual that celebrates the slower pace of summer living.
Ingredients
- Double shot of high-quality espresso (or 1/2 cup cold brew concentrate)
- 1 cup ice cubes (clear ice looks best!)
- 3/4 cup oat milk or whole milk
- 1 tablespoon vanilla or lavender simple syrup
- Optional: Dried lavender buds or cocoa powder for dusting
How to make it
- Brew your espresso and let it sit for two minutes to cool slightly; pouring piping hot coffee directly over ice can make it taste bitter and watery. Fill a tall, clear glass to the very top with fresh ice cubes.
- Pour your chosen simple syrup over the ice first, followed by the milk. This creates the base layer of the drink. Use a frother to foam about two tablespoons of milk separately if you want a professional-looking ‘cold foam’ topper.
- Slowly pour the espresso over the back of a spoon into the glass. The spoon breaks the fall of the coffee, allowing it to sit on top of the milk for a moment before it starts to slowly ‘bleed’ downward, creating that viral layered look.
- Stir gently just before drinking to combine the flavors. For the final aesthetic touch, sprinkle a few dried lavender buds or a light dusting of cocoa powder over the top. Serve with a reusable glass straw for maximum summer vibes.
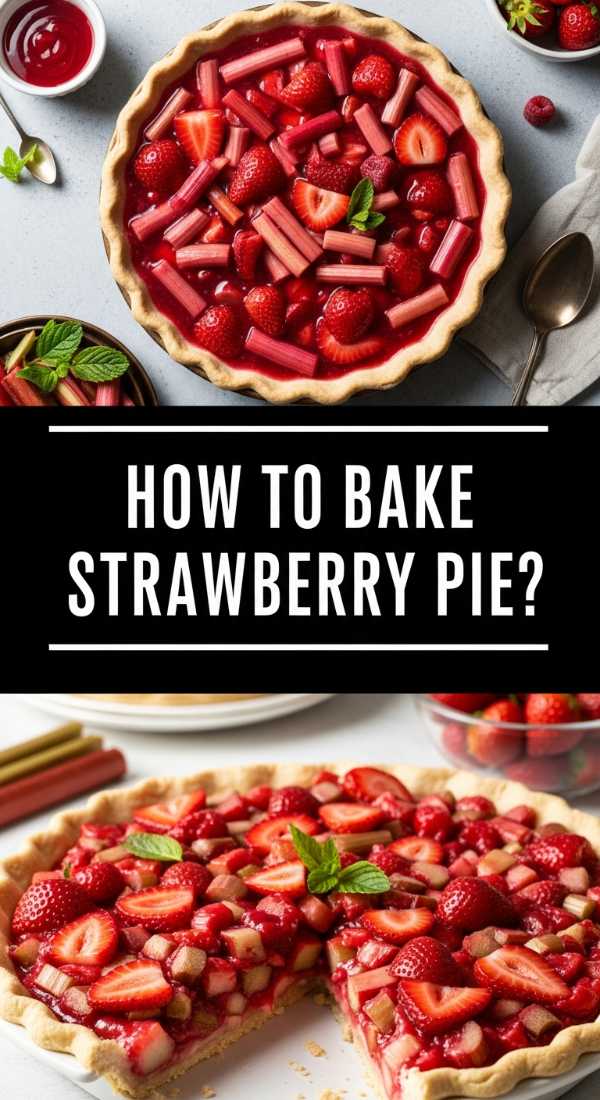
Strawberry Rhubarb Pie Baking Secrets

Why we love this
The marriage of strawberry and rhubarb is a culinary classic for a reason: the berries provide a lush, floral sweetness that perfectly tempers the rhubarb’s sharp bite. When baked correctly, the strawberries break down into a crimson glaze that coats the firm chunks of rhubarb, creating a filling that is both bright and deeply flavorful. The scent of sun-ripened fruit and warm pastry is the quintessential aroma of a summer kitchen, evoking memories of garden harvests and family picnics under the shade of big trees.
Ingredients
- 3 cups sliced rhubarb
- 2 cups fresh strawberries, hulled and quartered
- 1 cup granulated sugar
- 1/3 cup instant tapioca (the secret for perfect thickness)
- 1/2 teaspoon vanilla extract
- Double pie crust
How to make it
- The ‘secret’ to a non-runny fruit pie is using instant tapioca instead of flour. Mix the rhubarb, strawberries, sugar, vanilla, and tapioca in a bowl. Let this mixture macerate for at least 20 minutes. The tapioca needs this time to absorb the fruit juices before it hits the oven heat.
- Roll out your bottom crust and place it in the tin. Pour the fruit mixture in, ensuring the strawberries and rhubarb are distributed evenly. If there is a lot of excess liquid at the bottom of the bowl, leave the last tablespoon or two behind so the pie isn’t too wet.
- Top with a full crust or a lattice, but make sure to cut large vents if using a full top. This allows steam to escape, which is crucial for preventing a ‘soggy bottom.’ Brush with milk and sprinkle with coarse sparkling sugar for a crunchy texture.
- Bake at 425°F (220°C) for the first 15 minutes to set the crust, then lower to 375°F (190°C) and bake for another 40-50 minutes. If the edges get dark too quickly, wrap them in foil. Wait at least 4 hours—yes, 4 hours!—before cutting to ensure the tapioca has fully set the filling into a sliceable masterpiece.
Icing Graduation Sugar Cookies

Why we love this
Graduation sugar cookies are a delightful way to add a personalized touch to your celebration board. These cookies are soft and buttery, with a slight snap at the edges, topped with a smooth royal icing that hardens to a satin finish. The process of decorating them—piping names, graduation years, or tiny tassels—is incredibly meditative and rewarding. They act as both a treat and a party favor, carrying the festive theme through every bite with a sweet almond-vanilla flavor profile that everyone loves.
Ingredients
- 12-18 thick-cut sugar cookies (shaped like caps, diplomas, or stars)
- Royal Icing (confectioners’ sugar, meringue powder, and water)
- Gel food coloring (school colors!)
- Piping bags with small round tips (#1 or #2)
- Scribe tool or toothpick
How to make it
- Prepare your royal icing to two consistencies: ‘outline’ (the thickness of toothpaste) and ‘flood’ (the thickness of honey). Divide the icing into bowls and tint them with your gel colors. Gel is better than liquid because it won’t change the consistency of your icing.
- Use the outline icing to trace the edge of your cookie. This acts as a dam to hold the thinner icing in place. Let this dry for about 5 minutes until it feels firm.
- Fill the center of the outlined area with the flood icing. Use a scribe tool or a toothpick to pop any tiny air bubbles and to gently nudge the icing into the corners. Allow the cookies to dry completely (usually 6-8 hours or overnight) before adding details on top.
- Once the base layer is hard, use the outline icing again to pipe graduation years or decorative lines. This ‘layering’ technique adds dimension and a professional, high-end look. Arrange them on your board around the cake or cupcakes for a cohesive dessert theme.
Fresh Homemade Rhubarb Jam

Why we love this
Homemade rhubarb jam is like capturing springtime in a jar. It has a vibrant, neon-pink color that looks stunning when spread across a piece of crusty sourdough or a warm scone. The flavor is a sophisticated zing—sweet enough to be a treat, but with a lingering tartness that keeps you coming back for more. The texture is thick and spreadable, with small, tender pieces of fruit that burst with flavor. It’s the perfect addition to a breakfast board, bringing a bright acidity that cuts through rich butters and cheeses.
Ingredients
- 4 cups rhubarb, finely chopped
- 2 cups granulated sugar
- 1 tablespoon lemon juice
- 1 teaspoon lemon zest
- 1/2 teaspoon pure vanilla bean paste
How to make it
- In a heavy-bottomed saucepan, combine the chopped rhubarb, sugar, and lemon juice. Let the mixture sit for 30 minutes at room temperature; the sugar will draw out the moisture from the rhubarb, creating its own cooking liquid without the need for added water.
- Place the pan over medium heat and bring to a simmer, stirring frequently with a wooden spoon to prevent the sugar from scorching on the bottom. Once it reaches a boil, add the lemon zest and vanilla bean paste.
- Cook the jam for about 15-20 minutes. You are looking for the ‘gel point.’ To test this, place a small spoon of jam on a chilled plate from the freezer. Let it sit for a minute, then push it with your finger; if it wrinkles and stays in place, it’s done.
- Remove from heat and let it cool slightly before transferring to sterilized glass jars. The jam will continue to thicken as it cools. Store in the refrigerator for up to three weeks, or process in a water bath canner for long-term shelf storage.
Italian Summer Dinner Party Planning
[IMAGE_10]
Why we love this
An Italian-style summer dinner party is all about ‘la dolce vita’—the sweet life. This board-centric approach to dinner focuses on high-quality, simple ingredients that allow the natural flavors to shine. Think of the aroma of fresh basil being torn over sun-warmed tomatoes, the silky texture of olive oil, and the crisp, cold finish of a Pinot Grigio. It’s an effortless way to host, where the food is placed in the center of the table and everyone serves themselves, fostering a relaxed, communal atmosphere that lasts long after the sun goes down.
Ingredients
- Caprese components: Burrata cheese, heirloom tomatoes, fresh basil
- Focaccia bread with sea salt and rosemary
- Prosciutto-wrapped melon wedges
- Marinated olives and artichoke hearts
- A bottle of chilled Italian white wine or sparkling Limoncello spritz
How to make it
- Start with a massive central board as your ‘main course’ display. Arrange thick slices of heirloom tomatoes in a circle, nesting a large ball of Burrata cheese in the center. Drizzle generously with your best extra virgin olive oil and a balsamic glaze reduction.
- On the side of the board, place wedges of cantaloupe wrapped tightly in thin slices of salty prosciutto. The sweet-and-salty combination is a classic Italian summer staple that requires zero cooking but offers maximum flavor impact.
- Fill small ceramic bowls with the olives and artichokes, placing them near the edges of the board. Slice the focaccia into long strips and pile them high on one side, making them easy to grab for scooping up the creamy Burrata.
- To set the mood, use a low linen tablecloth and scattered tea lights. Serve the wine in stemless glasses for a more casual feel. The key is to prep everything 30 minutes before guests arrive so you can spend your time enjoying the conversation rather than being stuck in the kitchen.
Wrapping Up Your Viral Board Journey
And there you have it! Whether you’re whipping up a quick rhubarb jam to brighten your morning or assembly a massive Italian-themed board for your closest friends, the secret is always in the details. These boards are more than just food—they are a way to slow down and enjoy the process of creating something beautiful. I hope these recipes and tips inspire you to get into the kitchen tonight and try something new. Don’t forget to take a photo of your masterpiece before everyone dives in—after all, it’s not a viral board if you don’t share the love! Happy hosting!