

The Secret to the ‘Dreamy’ Aesthetic Everyone Is Posting on TikTok
Have you ever found yourself scrolling through TikTok at 11 PM, mesmerized by those hazy, golden-hour videos of lush gardens and whimsical backyard setups? There’s a specific kind of magic in those clips—a ‘dreamy’ aesthetic that feels both unattainable and deeply comforting. It’s more than just a filter; it’s about creating a lived-in sanctuary that prioritizes slow living and sensory joy. I spent weeks trying to figure out how to capture that essence without spending a fortune, and I discovered that the secret lies in the small, intentional DIY projects that turn a standard yard into a fairytale retreat.
We often think that a beautiful outdoor space requires a professional landscaper or a massive budget, but the truth is far more charming. The ‘dreamy’ look is actually built on texture, movement, and a bit of rustic imperfection. Whether it’s the sound of a bird splashing in a vintage basin or the way the light hits a handmade cedar planter, these elements invite you to step outside and actually breathe. In this guide, I’m breaking down the viral projects that will help you reclaim your outdoor space and turn it into the sanctuary of your dreams.
How to Create a Charming Bird Sanctuary Using Budget Finds

Why we love this
There is something deeply soul-soothing about waking up to the gentle symphony of birds chirping just outside your window. This project transforms a quiet corner of your yard into a bustling hub of life, filled with the soft flutter of wings and the glint of sunlight on water. You’ll find yourself lingering over your morning coffee, watching blue jays and chickadees explore their new home, feeling a profound connection to the natural world right at your doorstep. It’s an inexpensive way to add movement and sound to your garden, creating a peaceful atmosphere that feels miles away from the noise of daily life.
Essential Elements:
- Vintage pedestal bowl or shallow basin
- Decorative stones and river rocks
- Wildflower seeds or potted native plants
- Assorted bird feeders (tube and platform styles)
- High-quality birdseed mix and suet
- A shepherd’s hook or sturdy tree branch
How to make it
- Select a location that is visible from your window but quiet enough for birds to feel safe, preferably near some existing shrubbery for cover.
- Scour local thrift stores for a unique ceramic or glass basin; look for something with a bit of texture so birds can grip the edges easily.
- Thoroughly clean your chosen basin with a mixture of nine parts water to one part vinegar to ensure it is sterile before placing it on a stable surface.
- Fill the bottom of the basin with a layer of smooth river rocks, making sure some stones break the surface of the water to provide a landing spot for smaller birds.
- Install your feeders at varying heights—use a shepherd’s hook for a hanging feeder and place a platform feeder nearby to attract different species.
- Plant a small patch of native wildflowers around the base of the sanctuary to provide natural food sources and nesting materials.
- Fill the basin with fresh water daily and replenish the seed regularly, ensuring you clean the feeders once every two weeks to keep your feathered friends healthy.
How to Design a Lush Front Yard Landscape for Instant Curb Appeal

Why we love this
Stepping out of your car to a front yard that looks like a botanical painting is the ultimate mood booster. This ‘dreamy’ landscaping approach focuses on layered textures and a soft color palette that makes your home feel welcoming and established. Imagine the sweet fragrance of jasmine or lavender wafting toward you as you walk up the path, and the sight of ornamental grasses swaying in the breeze. It’s about creating a visual transition from the busy street to your private haven, using plants to soften the hard lines of your architecture and add a touch of romance to your everyday routine.
Essential Elements:
- Evergreen shrubs for year-round structure
- Perennial flowers (Lavender, Hydrangeas, or Salvia)
- Hardwood mulch or decorative bark chips
- Solar-powered path lights with warm-toned LEDs
- Landscape fabric and garden staples
- Natural stone or brick for edging
How to make it
- Start by sketching a rough plan of your yard, identifying the ‘sunny’ and ‘shady’ spots to ensure you choose plants that will actually thrive in your specific environment.
- Remove all existing weeds and grass from the designated flower beds, then use a garden fork to turn the soil to a depth of about 12 inches, mixing in organic compost.
- Lay out your plants while they are still in their nursery pots to visualize the spacing; place taller evergreens in the back and shorter, blooming perennials in the front.
- Dig holes that are twice as wide as the root ball but no deeper, ensuring the top of the root ball is level with the soil surface to prevent rot.
- Apply a 3-inch layer of hardwood mulch across the entire bed, keeping it a few inches away from the stems of the plants to allow for air circulation.
- Install your edging material—whether stone or brick—along the perimeter to create a clean, crisp line that separates the garden from the lawn.
- Position your solar path lights at 4-foot intervals along your walkway, angling them slightly toward the foliage to create a soft, ethereal glow after the sun sets.
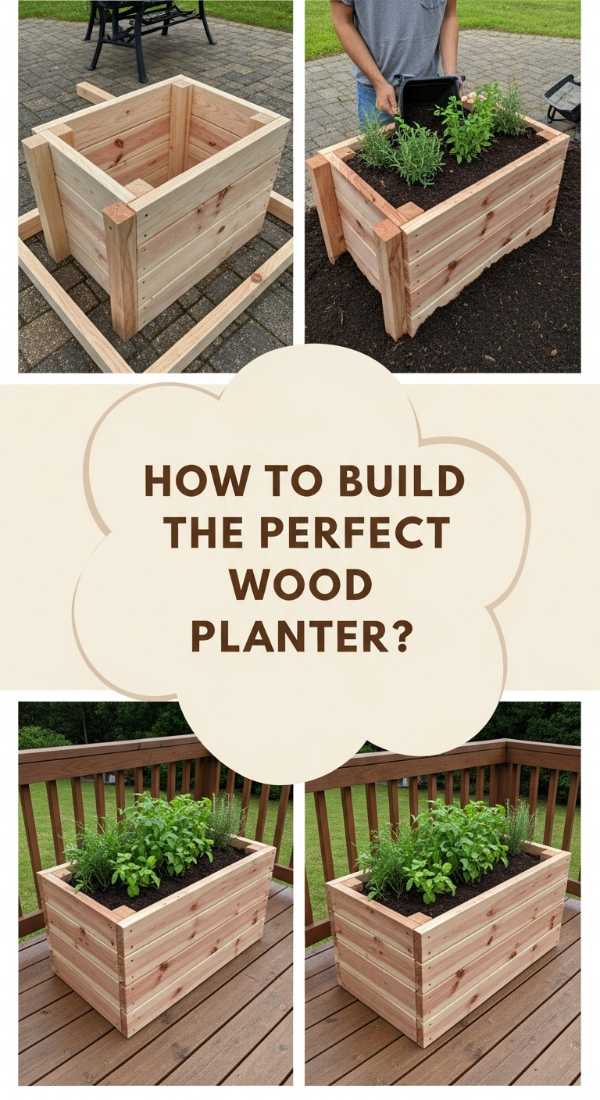
How to Build a Rustic Wood Planter for a Blooming Garden Balcony
Why we love this
Even the smallest balcony can be transformed into a lush retreat with the right container garden. This rustic wood planter brings the warmth of natural cedar and the vibrant colors of cascading flowers to an urban space, creating a vertical forest that feels cozy and intimate. There’s a tactile satisfaction in the rough-hewn wood and the earthy smell of fresh potting soil as you tuck in your favorite blooms. It’s the perfect way to surround yourself with greenery, offering a private nook where you can escape the city noise and enjoy the simple pleasure of watching things grow.
Essential Elements:
- Cedar or redwood planks (naturally rot-resistant)
- Exterior-grade wood screws
- Power drill and saw
- Heavy-duty landscape fabric (for lining)
- Staple gun
- High-quality potting mix and liquid fertilizer
How to make it
- Measure your balcony space and cut your wood planks into four sides and a bottom piece; for a classic look, aim for a box that is 18 inches long and 10 inches deep.
- Pre-drill pilot holes at the ends of your side boards to prevent the wood from splitting when you drive in the screws.
- Assemble the frame by screwing the sides together, then attach the bottom piece, ensuring you leave small gaps (about 1/8 inch) between the bottom slats for drainage.
- Sand any rough edges or splinters with 120-grit sandpaper until the wood feels smooth to the touch but still retains its rustic grain.
- Cut a piece of landscape fabric to fit the interior of the box and staple it securely to the top edges; this holds the soil in while allowing excess water to escape.
- Fill the planter with a lightweight potting mix, then plant a mix of ‘thriller’ (tall), ‘filler’ (mounded), and ‘spiller’ (trailing) plants for a professional look.
- Place the planter in a sunny spot on your balcony and water thoroughly until you see moisture dripping from the bottom, indicating the roots are well-hydrated.
How to Construct a Magical Outdoor Play Zone for Endless Childhood Memories

Why we love this
Creating a magical play zone is like building a portal to another world for your children. This isn’t just a playground; it’s a thoughtfully designed space that encourages imaginative play and outdoor exploration. Imagine the soft crunch of wood chips underfoot, the twinkle of fairy lights overhead as evening approaches, and the joyous sounds of kids lost in their own stories. It’s a space that prioritizes wonder over plastic, using natural materials and cozy corners to create a backyard destination that feels like a secret garden, making every afternoon feel like a grand adventure.
Essential Elements:
- Play-grade wood chips or pea gravel
- Weatherproof fairy lights or festoon bulbs
- Outdoor-rated canvas teepee or wooden playhouse
- Comfortable floor cushions and outdoor rugs
- Low-maintenance border plants like Boxwood
- Safe, non-toxic wood stain (if building structures)
How to make it
- Designate a flat, well-drained area of your yard and clear away any rocks or debris that could pose a tripping hazard.
- Level the ground using a rake and lay down a heavy-duty weed barrier to keep the play area clean and low-maintenance.
- Spread a 4-inch layer of play-grade wood chips over the barrier, which provides a soft landing surface and defines the boundaries of the play zone.
- Set up your central structure—a canvas teepee is perfect for temporary magic, while a small wooden playhouse offers a more permanent ‘home base.’
- String fairy lights between nearby trees or along the fence line, ensuring they are high enough to be out of reach but low enough to cast a warm glow over the area.
- Add an outdoor rug and several oversized cushions inside the structure to create a cozy reading or lounging nook for the kids.
- Introduce a small ‘nature basket’ filled with pinecones, smooth stones, and magnifying glasses to encourage active exploration of the surrounding garden.
How to Style a Whimsical Mud Kitchen for Creative Sensory Play

Why we love this
The mud kitchen is the ultimate ‘dreamy’ addition for families, blending rustic aesthetics with the tactile joy of sensory play. There is something incredibly grounding about the scent of wet earth mixed with fresh herbs like rosemary and mint. Watching a child ‘bake’ a mud pie topped with flower petals is a reminder of the simple beauty of childhood. This setup looks stunning in photos with its wooden textures and vintage kitchenware, but more importantly, it provides a dedicated space for messy, uninhibited creativity that connects children directly to the elements of nature.
Essential Elements:
- A sturdy wooden bench or repurposed potting table
- Old stainless steel or ceramic sink basin
- Assorted thrifted pots, pans, and wooden spoons
- A ‘pantry’ of natural items (dried beans, petals, sand)
- A functional water source (dispenser or hose attachment)
- Hanging hooks for utensils
How to make it
- Find a sturdy wooden table or build a simple frame using heat-treated pallets; ensure the height is appropriate for your child’s waist level.
- Cut a hole in the countertop that is slightly smaller than the lip of your sink basin, then drop the basin in and secure it with waterproof construction adhesive.
- Install a row of small brass or black hooks along the backboard of the kitchen to hang whisks, spoons, and measuring cups.
- Set up a large water dispenser with a spigot on one side of the counter so children can independently fill their pots and pans without needing a constant hose.
- Gather a collection of ‘ingredients’ from around the yard—acorns, pebbles, and fallen leaves—and store them in clear jars or wooden crates on a lower shelf.
- Sand the entire structure thoroughly to ensure there are no splinters, then apply a clear, food-safe outdoor sealant to protect the wood from water damage.
- Accessorize with a small chalkboard for the ‘menu of the day’ to add an extra layer of imaginative role-play to the experience.
How to Arrange a Serene Hot Tub Oasis for Total Evening Relaxation

Why we love this
Imagine the steam rising into the crisp night air as you sink into bubbling, warm water, surrounded by the soft glow of lanterns and the rustle of nearby leaves. A hot tub oasis is the pinnacle of the ‘dreamy’ lifestyle, offering a private spa experience that melts away the stress of the day. The contrast between the cool night air and the heat of the water creates a sensory experience that is both invigorating and deeply relaxing. It’s the perfect spot for quiet reflection or intimate conversation, turning your backyard into a luxury destination that you never want to leave.
Essential Elements:
- Hot tub (plug-and-play or hardwired)
- Privacy screens (slatted wood or bamboo)
- Dimmable outdoor lanterns and candles
- Outdoor towel rack and plush robes
- Weather-resistant side table for drinks
- Potted palms or tall grasses for greenery
How to make it
- Ensure you have a level, reinforced concrete pad or a sturdy deck capable of supporting the weight of the hot tub when filled with water and people.
- Position the hot tub to maximize privacy, using the house or existing fences as a natural shield from neighbors.
- Install slatted wood privacy screens or tall bamboo planters around the perimeter to create a ‘walled-in’ garden feel without blocking all the airflow.
- Set up a dedicated towel station nearby with a waterproof rack and a basket of oversized, fluffy towels to make the transition out of the water comfortable.
- Place a small, stable side table within arm’s reach of the tub to hold refreshments, ensuring it has a non-slip surface.
- Layer your lighting by using a combination of solar-powered lanterns on the ground and string lights draped through the screen or overhead branches.
- Add a few drops of eucalyptus or lavender essential oil to the surrounding planters (not the tub water!) to enhance the spa-like aroma of the space.
How to Repurpose Simple Wood Pallets into a Functional Play Kitchen

Why we love this
There is a rugged, farmhouse charm to a pallet play kitchen that store-bought plastic versions simply can’t match. This project is the epitome of sustainable DIY, turning discarded materials into a centerpiece of backyard play. You’ll love the way the weathered wood develops a beautiful patina over time, and the way the kitchen blends seamlessly into a garden setting. It feels like a miniature version of a rustic country kitchen, providing a space where the aroma of pine and the texture of sun-warmed wood inspire hours of creative, screen-free entertainment for the little ones.
Essential Elements:
- Two or three heat-treated (HT) wood pallets
- Wood glue and heavy-duty screws
- Orbit sander and various sandpaper grits
- Outdoor-safe paint or wood stain
- Old knobs or handles from a hardware store
- Plastic bins for ‘oven’ and ‘cupboard’ inserts
How to make it
- Source pallets that are marked with ‘HT’ (Heat Treated), which indicates they are safe from harmful chemicals and suitable for children’s projects.
- Disassemble one pallet using a pry bar to get individual slats, while keeping the second pallet intact to serve as the main backboard and support structure.
- Sand every square inch of the wood, starting with 60-grit and working up to 120-grit, until the surface is completely smooth and safe for little hands.
- Build a simple rectangular base using the pallet slats, then attach the intact pallet vertically to the back to create the ‘wall’ of the kitchen.
- Create a ‘stovetop’ by painting four black circles on the counter and attaching old stove knobs that can actually turn for a realistic feel.
- Install a small shelf on the backboard for storing spices or jars of ‘nature ingredients’ like sand and pebbles.
- Finish with two coats of an exterior-grade clear sealer to protect the wood from the elements while maintaining its natural, rustic aesthetic.
How to Assemble a Splashy Water Table for Cool Summer Fun

Why we love this
When the heat of summer hits, there is no sound more refreshing than the splash and trickle of cool water. A DIY water table is a sensory playground that keeps kids engaged for hours, offering a tactile way to explore physics and cooling down. The sparkling reflection of the sun on the water and the rhythmic pouring of buckets create a hypnotic, peaceful environment. Unlike bulky plastic toys, a custom-built water table can be designed to match your garden’s aesthetic, using natural tones and materials that make it look like a purposeful part of your outdoor living design.
Essential Elements:
- Large, shallow plastic storage bin
- Wooden frame materials (Pressure-treated 2x4s)
- Battery-operated or solar water pump
- Assorted plastic tubing and funnels
- Floating toys, scoops, and measuring cups
- Non-slip mat for the surrounding area
How to make it
- Build a simple H-frame base using pressure-treated lumber, ensuring the height is ergonomic for a standing child (usually around 20-24 inches).
- Secure the plastic bin into the frame by creating a lip that the edges of the bin can rest on, ensuring it stays level even when filled with heavy water.
- Install a small solar-powered fountain pump in the center of the bin to create a continuous flow, which keeps the water moving and prevents mosquitoes.
- Attach a series of PVC pipes or clear tubing to the wooden backboard using U-brackets to create a ‘water wall’ that drains back into the main bin.
- Fill the table with fresh, clean water and add a few drops of blue food coloring if you want to enhance the visual ‘ocean’ effect.
- Place a variety of tactile objects inside, such as smooth sea glass, plastic boats, and sponges, to provide different sensory experiences.
- Ensure you empty and wipe down the bin after each use to prevent algae growth and keep the play area hygienic.
How to Plant a Vibrant Flower Garden for a Welcoming Home Entrance

Why we love this
A vibrant flower garden at your entrance is like a warm hug for anyone who visits. It’s a riot of color and life that instantly elevates the mood of your home, turning a simple walkway into a ‘dreamy’ floral path. You’ll love the way the heavy heads of peonies lean toward the sun and the way the bees hum softly among the foxgloves. The scent of damp earth and blooming petals creates an olfactory welcome that is unforgettable, making every arrival feel special and every departure a little bit harder. It’s the ultimate expression of a home that is cared for and loved.
Essential Elements:
- Mix of perennials (Coneflowers, Peonies) and annuals (Zinnias, Petunias)
- Quality garden soil and organic compost
- A set of sharp pruning shears
- Slow-release flower fertilizer
- Decorative mulch (cedar or pine)
- Hand trowel and garden gloves
How to make it
- Identify the sun exposure of your entrance; most ‘vibrant’ flowers require at least 6 hours of direct sunlight to bloom at their full potential.
- Prepare the planting bed by removing all grass and weeds, then tilling in a 4-inch layer of organic compost to provide the nutrients your flowers will crave.
- Arrange your plants by height, placing the tallest varieties (like Foxgloves or Delphiniums) in the back and the shortest (like Pansies) along the edge.
- When planting, gently tease the roots if they are circling the pot to encourage them to grow outward into the new soil.
- Water each plant immediately after planting with a gentle shower setting to settle the soil around the roots and remove air pockets.
- Apply a layer of mulch to help retain moisture and suppress weeds, taking care not to pile it directly against the stems of the flowers.
- Deadhead (remove) spent blooms throughout the season to encourage the plants to put their energy into producing even more flowers.
How to Craft a Modern Timber Planter for Stylish Porch Greenery

Why we love this
For those who prefer a cleaner, more contemporary ‘dreamy’ look, the modern timber planter is the perfect solution. It combines the heavy, substantial feel of thick lumber with sleek, architectural lines that make a bold statement on any porch. There’s a wonderful contrast between the solid, unyielding wood and the soft, organic shapes of the plants within. This project adds a sense of high-end design to your outdoor space, providing a sophisticated backdrop for structural plants like snake plants or ornamental grasses that catch the light beautifully during the golden hour.
Essential Elements:
- 4×4 or 6×6 Cedar timbers
- Long timber screws (6-inch or 8-inch)
- Heavy-duty miter saw
- High-torque drill
- Dark wood stain or clear UV protectant
- Plastic liner or heavy-duty pond liner
How to make it
- Cut your timbers into equal lengths; for a square planter, you’ll need four pieces per layer. A common height is three or four layers of 4×4 timbers.
- Stack the first layer on a flat surface and use a square to ensure the corners are perfectly 90 degrees before moving forward.
- Stagger the joints of the second layer (like bricks) to provide structural integrity and a more professional, architectural appearance.
- Pre-drill deep pilot holes through the top timber and into the one below it, then drive the long timber screws in to lock the layers together.
- Sand the exterior faces of the timbers until they are smooth, then apply a rich, dark stain to give the planter a modern, high-end finish.
- Line the interior with a heavy-duty plastic liner, stapling it to the inside walls and poking several drainage holes through the bottom.
- Fill with a high-quality, well-draining potting mix and plant a single, dramatic specimen like a Japanese Maple or a cluster of tall ornamental grasses for maximum impact.
Creating Your Own Slice of Heaven
Building a ‘dreamy’ outdoor life isn’t about perfection; it’s about creating spaces that reflect your personality and invite you to slow down. Whether you start with a simple bird sanctuary or go all-out with a modern timber planter, each project adds a layer of magic to your home. These DIYs prove that with a little creativity and some budget-friendly finds, you can transform any yard into a viral-worthy sanctuary. So, put down the phone, grab your garden gloves, and start building the aesthetic you’ve been dreaming of. Your personal oasis is just one project away!